

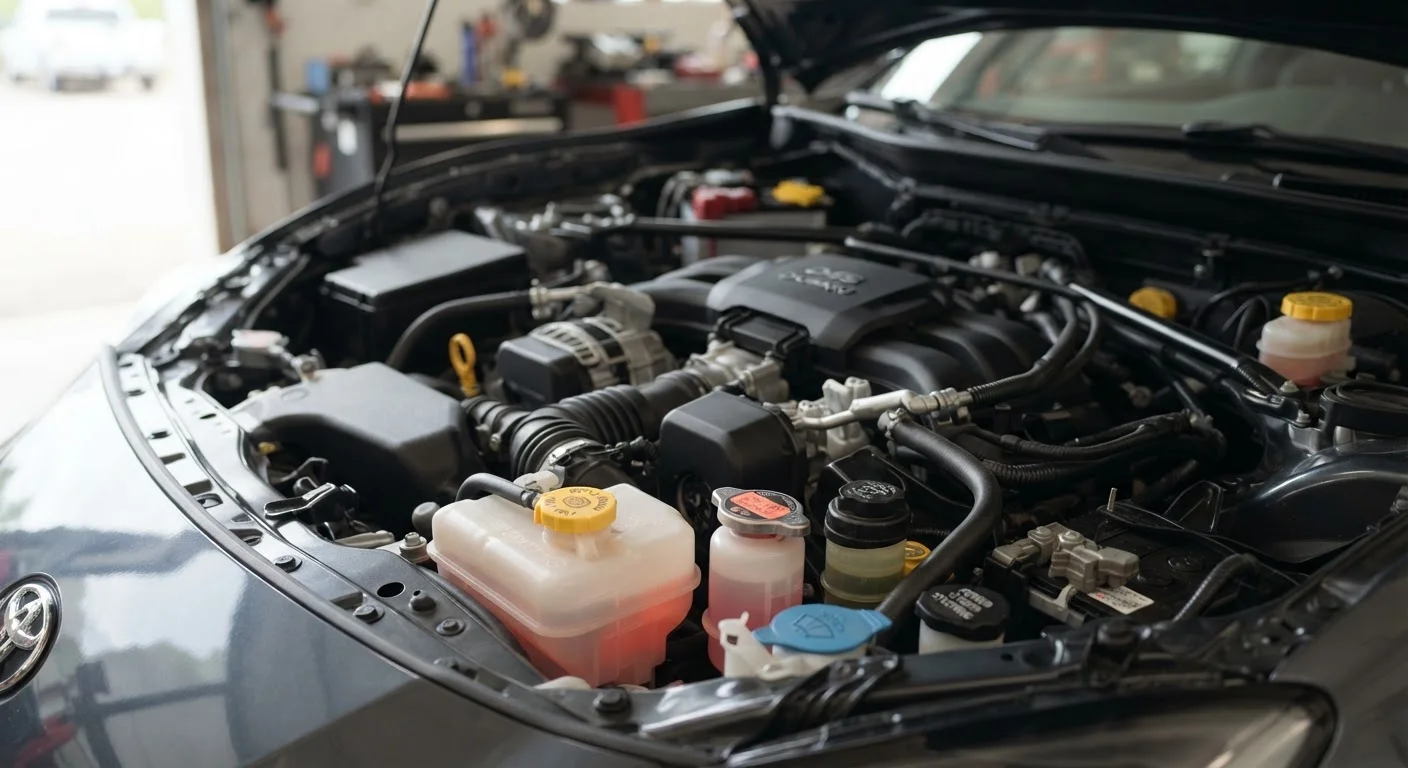
Key Takeaways
- Most vehicles carry six essential fluids, each serving a distinct and critical function.
- Checking fluid levels takes under 20 minutes and requires no special tools beyond a clean rag.
- Color, smell, and level are the three cues that reveal whether a fluid needs attention.
- Your owner's manual specifies the correct fluid types and change intervals for your specific vehicle.
- Neglecting fluid maintenance is one of the most common causes of preventable, costly breakdowns.
What you will need
Why Fluids Are Your Car's Lifeline
Modern vehicles depend on a network of fluids to lubricate, cool, pressurize, and protect their moving parts. Unlike a blown tire or a dead battery, fluid problems rarely announce themselves dramatically - they build quietly until a component fails. Understanding what each fluid does, and catching changes early, is one of the most cost-effective forms of car care available to any driver.
This guide is part of a broader approach to ownership covered in our plain-English maintenance primer - a resource for anyone who wants to understand their vehicle without needing a mechanical background. For a structured, season-by-season approach to fluid checks and other tasks, the seasonal car care checklist is a practical companion.
Six fluids deserve regular attention in most passenger vehicles:
- Engine oil - lubricates internal moving parts and carries heat away from the engine
- Coolant (antifreeze) - regulates engine temperature and prevents freezing or boiling
- Brake fluid - transmits hydraulic pressure from the pedal to the brakes
- Transmission fluid - lubricates and cools the transmission's gears and clutch packs
- Power steering fluid - provides hydraulic assist for easier steering (in equipped vehicles)
- Windshield washer fluid - keeps your windshield clear for safe visibility
What you will need
What to Look For: Color, Level, and Smell
Each fluid communicates its condition through three observable cues: level, color, and smell. A fluid that is low, discolored, or has an unusual odor is sending a signal - and catching it early is almost always cheaper than ignoring it.
Never Check Fluids on a Hot Engine
Coolant reservoirs and some other components are under pressure when the engine is warm. Opening a hot radiator cap can cause scalding fluid to eject suddenly. Always let the engine cool for at least 30 minutes before inspecting fluids, and keep your face away from reservoir caps when opening them.
Brake fluid deserves particular attention. Because it absorbs moisture over time, it degrades even if you never notice a drop in level. Dark, contaminated brake fluid reduces stopping performance - a risk that goes beyond inconvenience. For a deeper look at how the braking system uses this fluid, see our explanation of how brake pads, rotors, and calipers work together.
Build Fluid Checks Into a Routine
Pairing a quick fluid inspection with every other fuel fill-up makes it easy to stay ahead of problems. Keep a clean microfiber rag in your trunk specifically for dipstick checks. If you drive fewer than 10,000 miles per year, a monthly visual inspection covers most fluid concerns.
Your owner's manual is the definitive guide to fluid types, check intervals, and reservoir locations specific to your vehicle. The guide to reading your owner's manual explains how to get the most out of that often-overlooked resource. If your vehicle has crossed the 100,000-mile mark, maintenance habits for high-mileage vehicles covers how fluid care becomes even more important as components age.
Owner's Manual
Identifies correct fluid specifications, reservoir locations, and manufacturer-recommended change intervals for your exact vehicle.
Clean Lint-Free Rag
Used to wipe dipsticks clean before and after reading oil or transmission fluid levels.
Flashlight or Work Light
Helps illuminate the engine bay and clearly read fluid levels in translucent reservoirs.
Funnel
Prevents spills when adding fluid to narrow reservoir openings.
Step-by-Step: How to Check Each Fluid
Follow these steps in order, working from engine-off checks to any that require the engine running. The entire process typically takes 10 to 20 minutes and requires nothing more than a rag and your owner's manual.
Park on a Level Surface and Let the Engine Cool
Pull onto a flat, stable surface - even a slight incline can skew fluid level readings. Turn off the engine and wait at least 30 minutes before opening the hood. This allows hot components to cool and lets oil drain back into the pan for an accurate dipstick reading.
Check the Engine Oil
Locate the oil dipstick - typically marked with a bright yellow or orange handle. Pull it out, wipe it clean with your rag, reinsert it fully, then pull it again. The oil level should fall between the two marks at the bottom of the dipstick. Also note the color: healthy oil ranges from amber to light brown. Black, gritty, or milky oil signals it's overdue for a change or may indicate a deeper problem.
Inspect the Coolant (Antifreeze) Level
The coolant reservoir is a translucent plastic tank, usually located near the radiator. With the engine cold, check that the fluid sits between the MIN and MAX lines on the outside of the tank. Coolant is typically bright green, orange, or pink depending on the type your vehicle uses. A consistently low level may indicate a slow leak - check for puddles under the front of the car.
Check the Brake Fluid
The brake fluid reservoir sits on top of the master cylinder, usually near the firewall on the driver's side. Most reservoirs are translucent, so you can read the level without opening them. It should sit between MIN and MAX. Brake fluid is naturally pale yellow to clear; dark brown fluid indicates moisture contamination and the fluid should be replaced. A noticeably low level may point to a leak or worn brake pads - either warrants a professional inspection.
Examine the Transmission Fluid
Automatic transmissions typically have a dipstick (some newer vehicles require a mechanic to check this at a shop - consult your manual). With the engine warmed up and running in Park, pull the dipstick, wipe, reinsert, and read. Healthy transmission fluid is pink to red and slightly transparent. Dark red, brown, or fluid with a burnt smell needs servicing. Manual transmissions generally don't have a dipstick and are checked via a fill plug - leave that check to a technician.
Look at Power Steering Fluid
The power steering reservoir - labeled with a steering wheel icon - is usually a small capped container near the front of the engine. Many are translucent with MIN/MAX lines; others use a dipstick built into the cap. The fluid should be clear to light amber. Dark or foamy fluid signals degradation. Note that many newer vehicles use electric power steering and have no fluid reservoir at all - your owner's manual will confirm which system your car uses.
Check the Windshield Washer Fluid
While not mechanical in nature, a full washer fluid reservoir directly affects visibility and safety. Locate the reservoir - usually marked with a windshield/water symbol - and fill it to the neck with commercially available washer fluid. Do not substitute plain water, especially in cold climates, as it can freeze in the lines and crack the reservoir.
Wrong Fluid Type Can Cause Serious Damage
Using the incorrect grade of transmission fluid, brake fluid, or coolant can degrade seals and cause component failure. Always cross-reference your owner's manual or the label printed on each reservoir cap before topping off. When in doubt, consult a qualified mechanic rather than guessing.
Keeping up with these checks is one of the simplest ways to protect your vehicle's long-term reliability. For the full picture on how routine maintenance translates into real-world savings and longevity, see our article on the long-term payoff of routine maintenance.